

-
1. 起步
-
2. Git 基础
-
3. Git 分支
-
4. 服务器上的 Git
- 4.1 协议
- 4.2 在服务器上部署 Git
- 4.3 生成 SSH 公钥
- 4.4 架设服务器
- 4.5 Git Daemon
- 4.6 Smart HTTP
- 4.7 GitWeb
- 4.8 GitLab
- 4.9 第三方托管服务
- 4.10 小结
-
5. 分布式 Git
-
A1. 附录 A: Git 在其他环境
- A1.1 图形界面
- A1.2 Visual Studio 中的 Git
- A1.3 Visual Studio Code 中的 Git
- A1.4 IntelliJ / PyCharm / WebStorm / PhpStorm / RubyMine 中的 Git
- A1.5 Sublime Text 中的 Git
- A1.6 Bash 中的 Git
- A1.7 Zsh 中的 Git
- A1.8 PowerShell 中的 Git
- A1.9 小结
-
A2. 附录 B: 在应用程序中嵌入 Git
-
A3. 附录 C: Git 命令
7.13 Git 工具 - 替换
替换
正如我们之前强调过的,Git 对象数据库中的对象是不可变的,但 Git 提供了一种有趣的方式来“假装”用其他对象替换数据库中的对象。
replace 命令允许你指定 Git 中的一个对象,并告诉 Git:“每次引用这个对象时,都假装它是另一个不同的对象”。这在不需要使用 git filter-branch 等命令重写整个历史记录的情况下,用另一个提交替换历史记录中的某个提交是最有用的。
例如,假设你有一个庞大的代码历史记录,想将你的仓库拆分成一个包含简短历史的新手开发人员版本和一个包含更长、更大的数据挖掘感兴趣人员版本。你可以通过“替换”新历史记录的第一个提交,使其指向旧历史记录的最后一个提交,从而将一个历史记录“嫁接”到另一个历史记录上。这样做的好处是,你实际上不需要重写新历史记录中的每一个提交,正如你通常为了将它们连接起来所必须做的那样(因为父提交关系会影响 SHA-1 值)。
让我们来试试。我们取一个现有的仓库,将其拆分成两个仓库,一个最近的历史,一个历史悠久的版本,然后我们将看看如何在不通过 replace 修改最近仓库的 SHA-1 值的情况下将它们重新组合。
我们将使用一个包含五个简单提交的简单仓库。
$ git log --oneline
ef989d8 Fifth commit
c6e1e95 Fourth commit
9c68fdc Third commit
945704c Second commit
c1822cf First commit
我们想将它分解成两条历史线。一条线从提交一到提交四,这将是历史悠久的版本。第二条线只有提交四和提交五,这将是最近的历史。
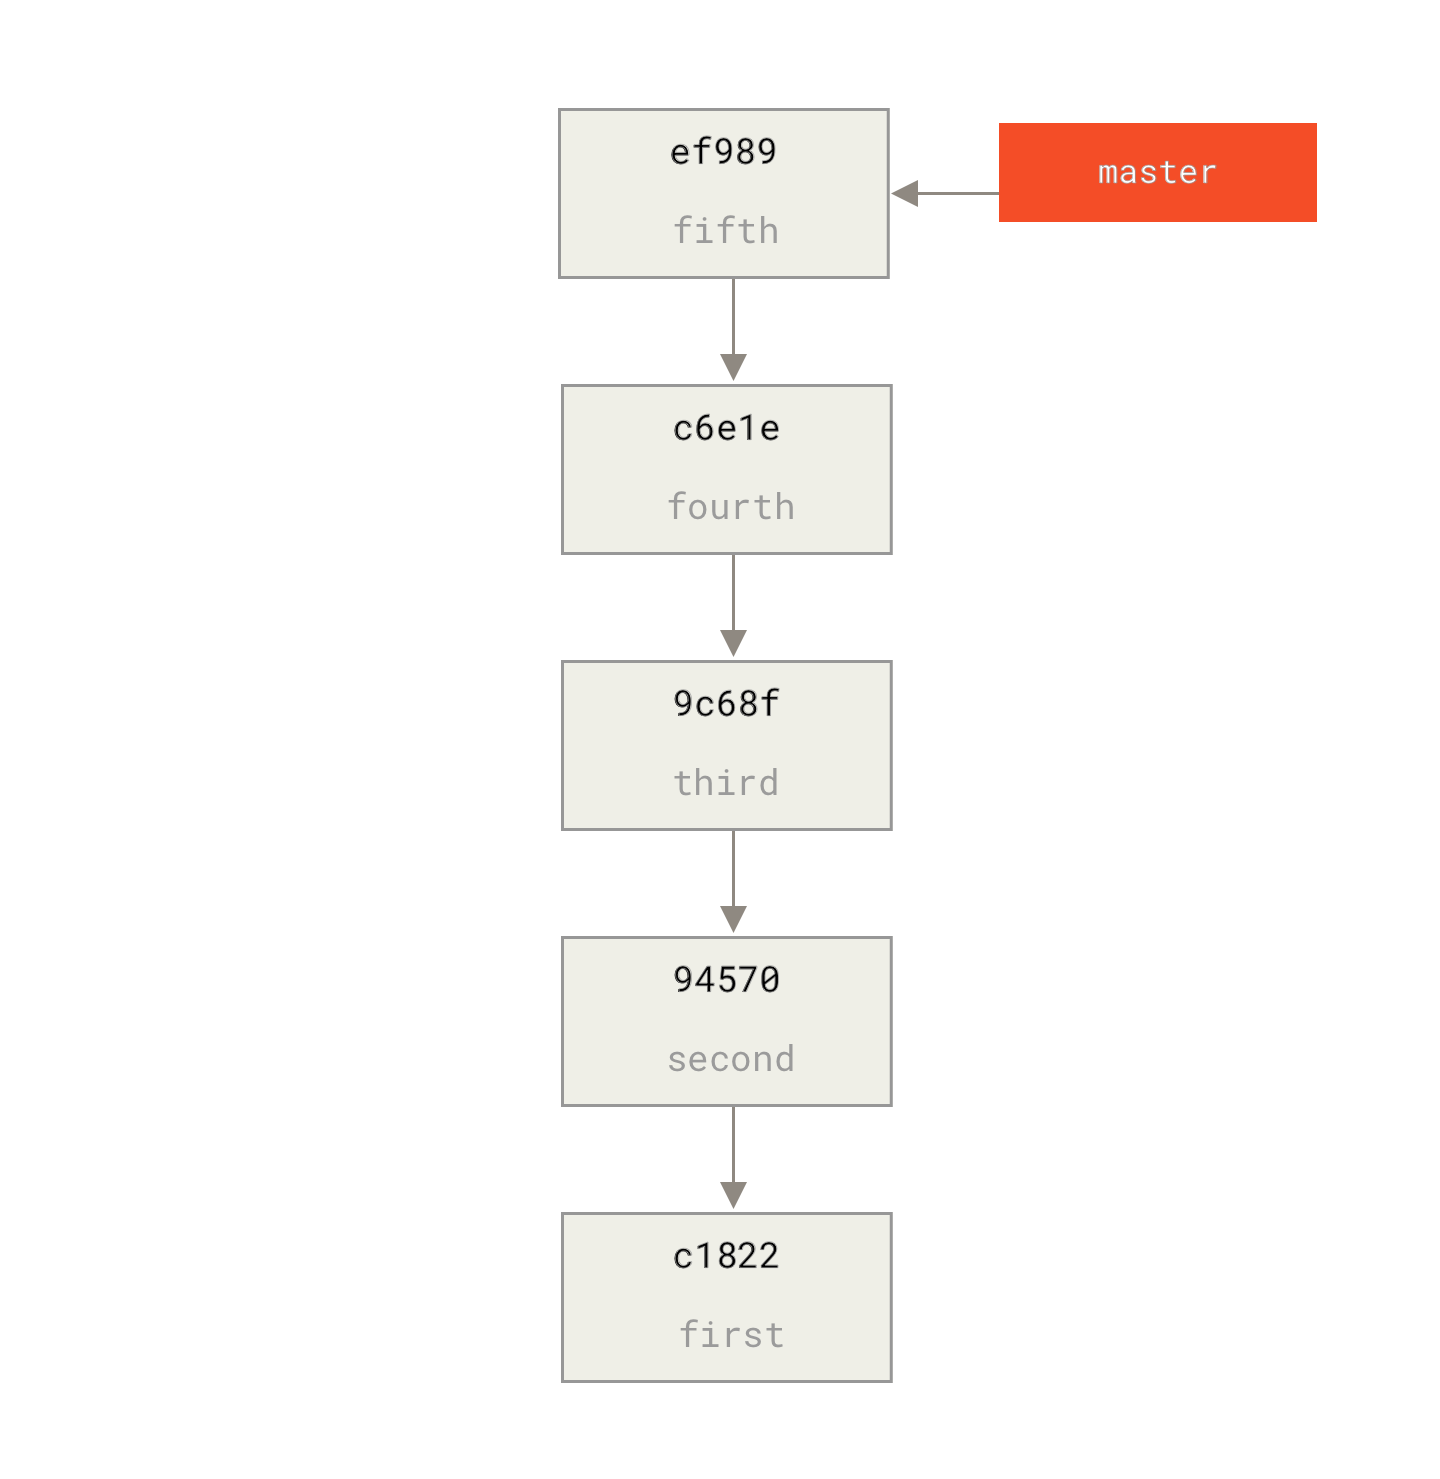
好吧,创建历史悠久的版本很简单,我们可以将一个分支指向该历史记录,然后将该分支推送到新远程仓库的 master 分支。
$ git branch history c6e1e95
$ git log --oneline --decorate
ef989d8 (HEAD, master) Fifth commit
c6e1e95 (history) Fourth commit
9c68fdc Third commit
945704c Second commit
c1822cf First commit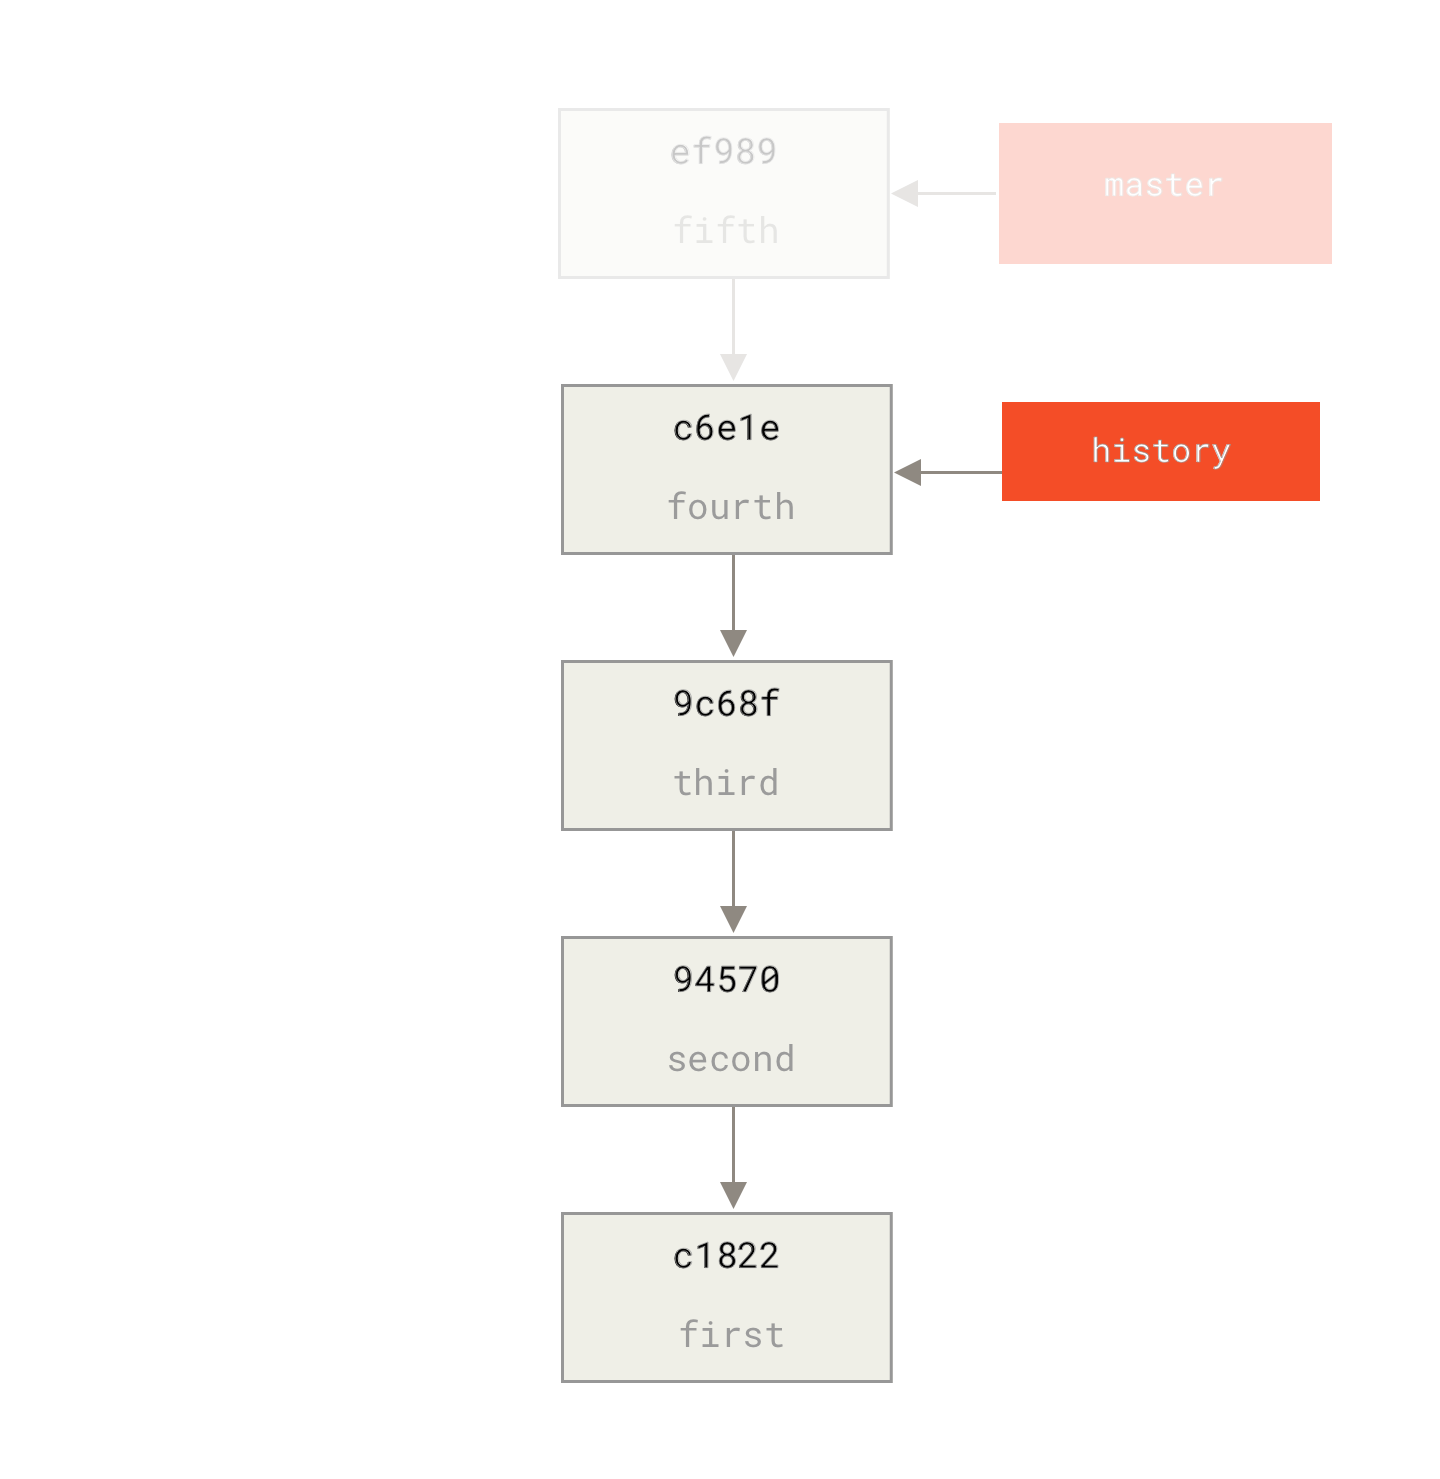
history 分支现在我们可以将新的 history 分支推送到我们新仓库的 master 分支。
$ git remote add project-history https://github.com/schacon/project-history
$ git push project-history history:master
Counting objects: 12, done.
Delta compression using up to 2 threads.
Compressing objects: 100% (4/4), done.
Writing objects: 100% (12/12), 907 bytes, done.
Total 12 (delta 0), reused 0 (delta 0)
Unpacking objects: 100% (12/12), done.
To git@github.com:schacon/project-history.git
 * [new branch]      history -> master
好的,我们的历史记录已发布。现在更难的部分是将我们最近的历史记录截断,使其更小。我们需要一个重叠点,这样我们就可以用一个仓库中的提交替换另一个仓库中的等效提交,所以我们将把它截断为只包含提交四和提交五(因此提交四是重叠的)。
$ git log --oneline --decorate
ef989d8 (HEAD, master) Fifth commit
c6e1e95 (history) Fourth commit
9c68fdc Third commit
945704c Second commit
c1822cf First commit
在这种情况下,创建一个包含如何扩展历史记录的说明的基提交会很有用,这样其他开发人员就知道,如果他们遇到截断历史记录中的第一个提交并需要更多信息,该怎么做。所以,我们将创建一个初始提交对象作为我们的基点,并附带说明,然后将剩余的提交(四和五)重新定位到其之上。
为此,我们需要选择一个分割点,对我们来说是第三个提交,用 SHA-1 来说是 9c68fdc。所以,我们的基提交将基于那个树。我们可以使用 commit-tree 命令创建我们的基提交,它只需要一个树,然后会给我们一个全新的、无父提交的对象 SHA-1。
$ echo 'Get history from blah blah blah' | git commit-tree 9c68fdc^{tree}
622e88e9cbfbacfb75b5279245b9fb38dfea10cf|
注意
|
|
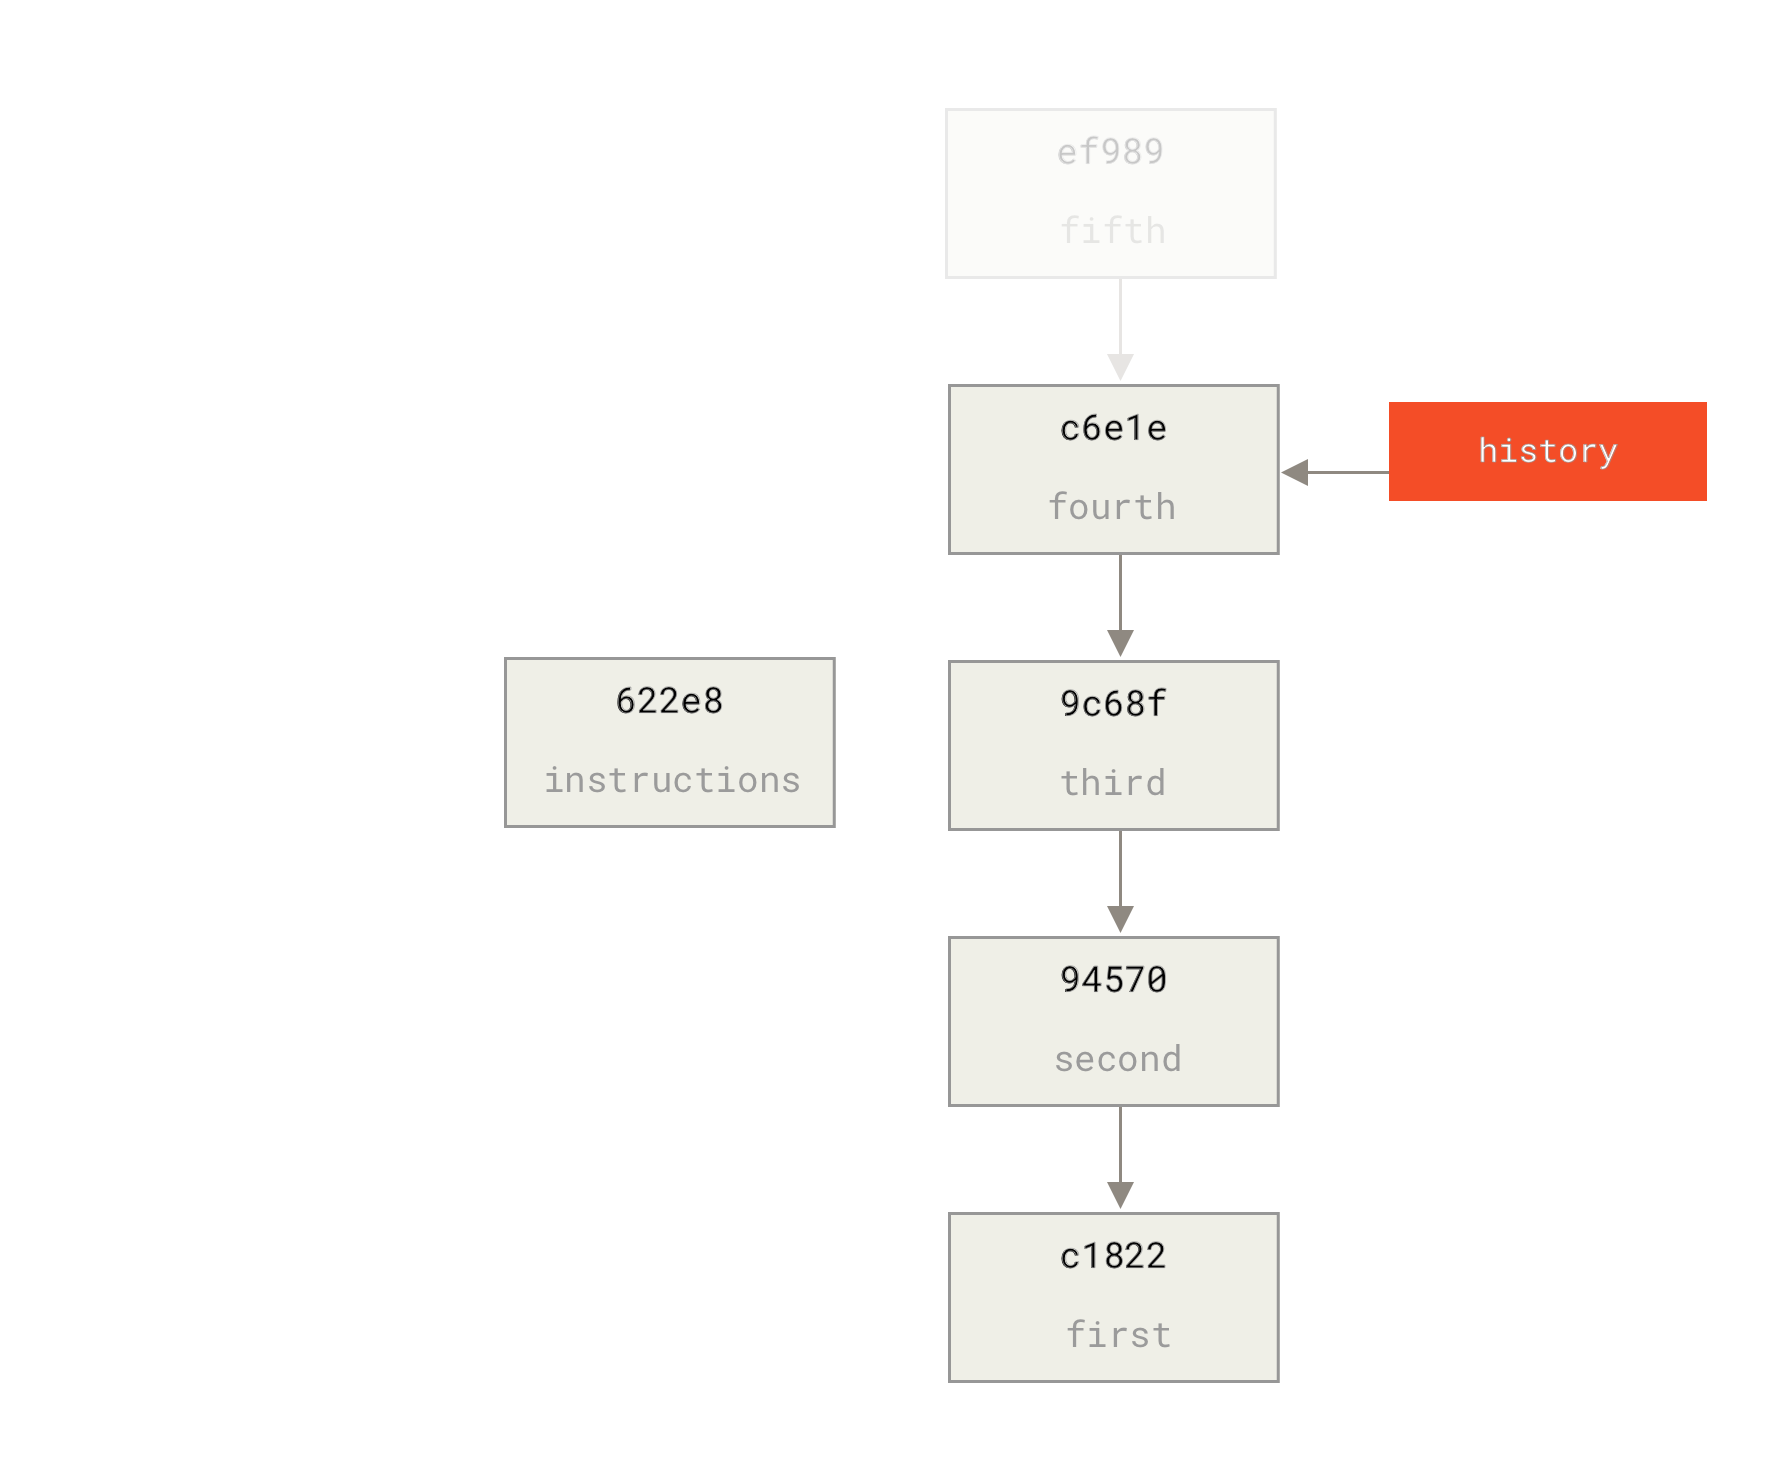
commit-tree 创建基提交好的,现在我们有了一个基提交,我们可以使用 git rebase --onto 将我们剩余的历史记录重新定位到其之上。--onto 参数将是我们刚刚从 commit-tree 收到的 SHA-1,而 rebase 点将是第三个提交(我们想保留的第一个提交的父提交,9c68fdc)。
$ git rebase --onto 622e88 9c68fdc
First, rewinding head to replay your work on top of it...
Applying: fourth commit
Applying: fifth commit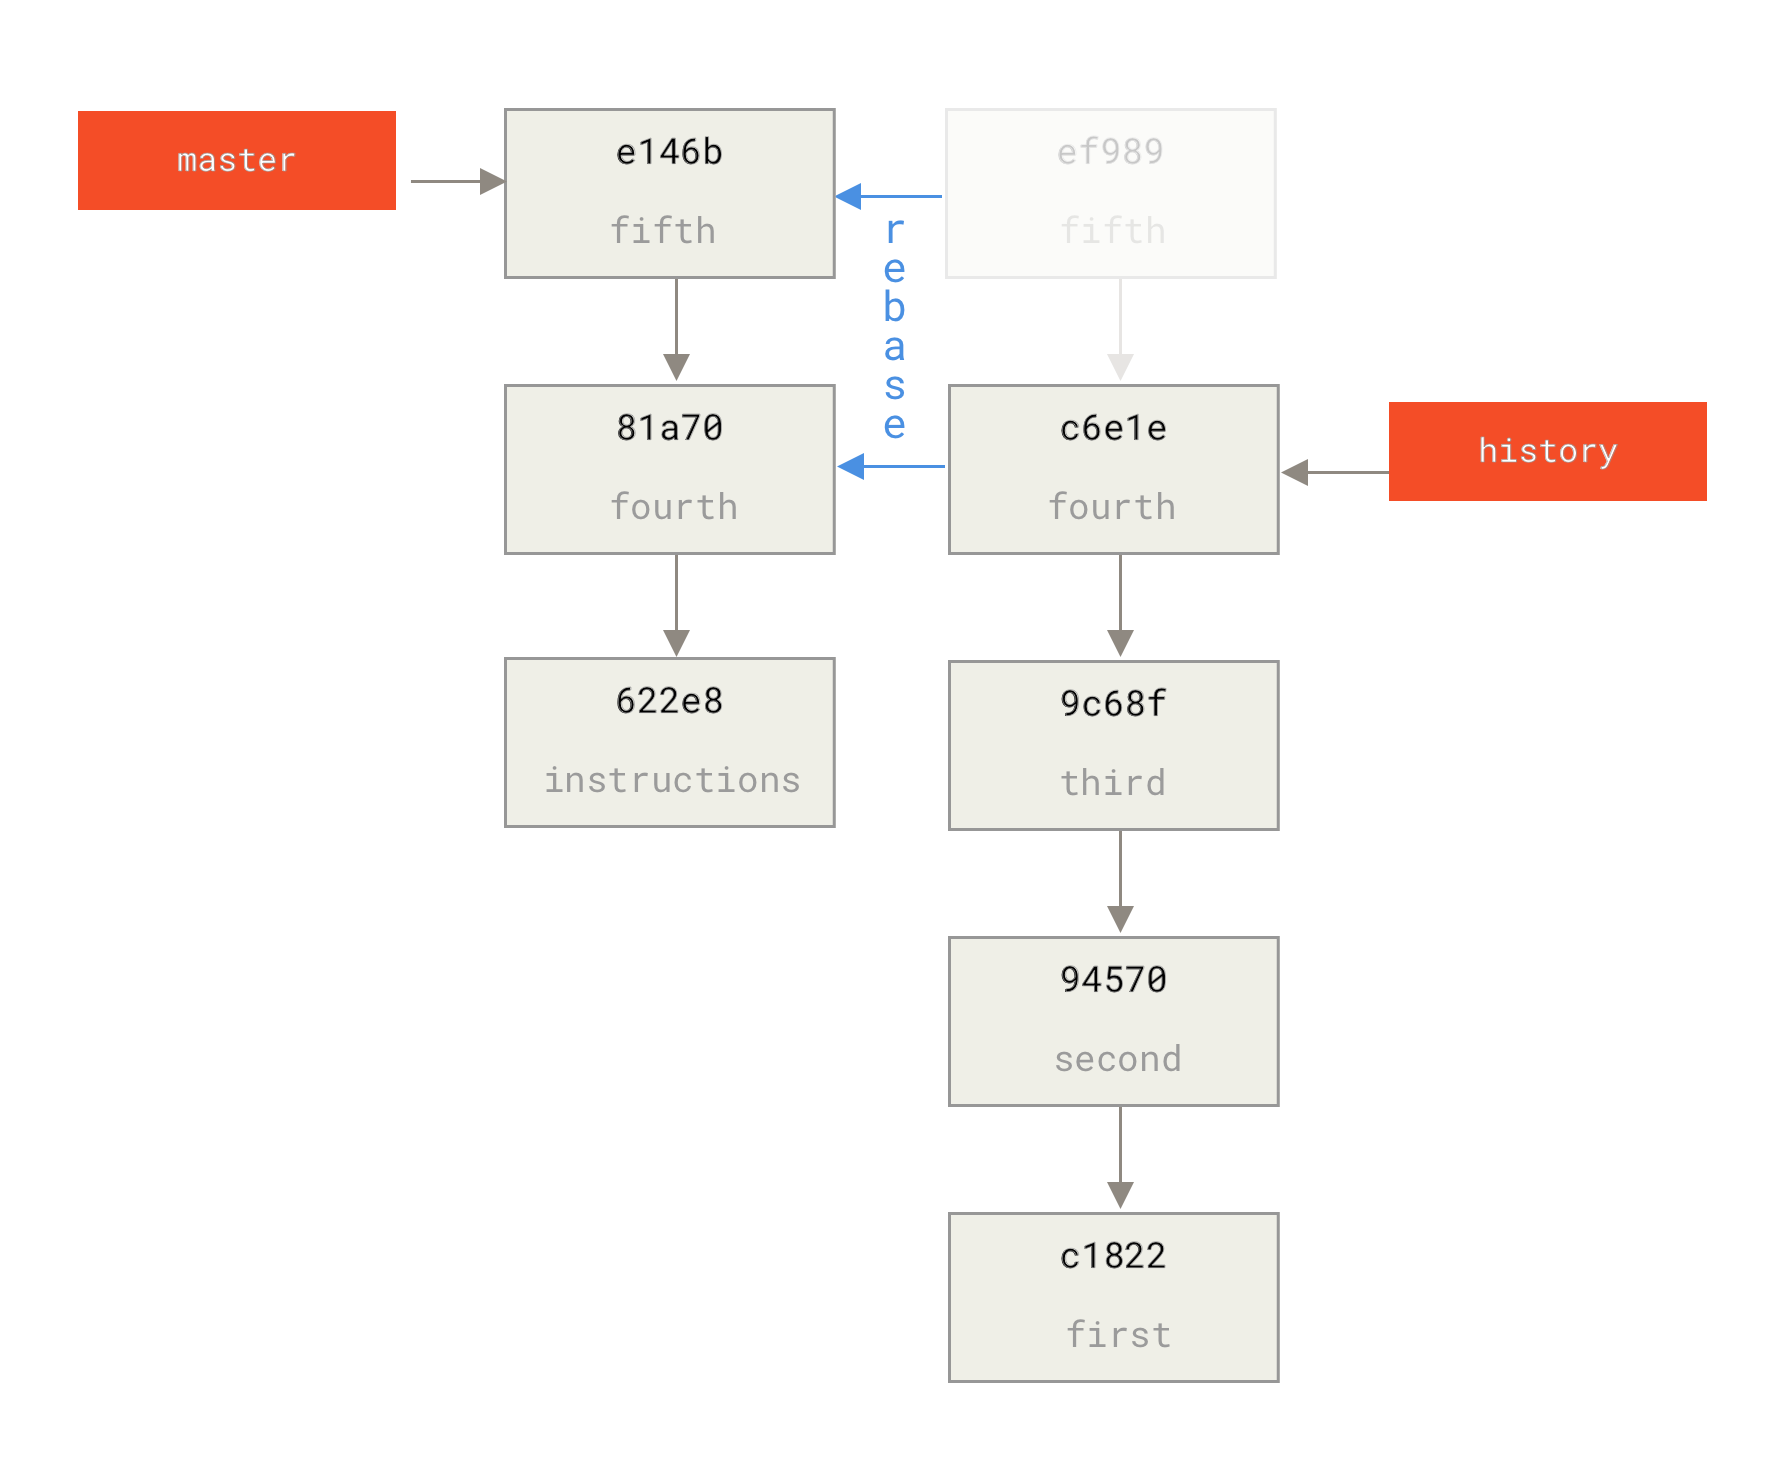
好的,现在我们已经将我们的最近历史记录重写到了一个一次性的基提交之上,该基提交现在包含了如何根据需要重构整个历史记录的说明。我们可以将这个新的历史记录推送到一个新的项目,现在当人们克隆该仓库时,他们只会看到最近的两个提交和一个带有说明的基提交。
现在,让我们切换到第一次克隆项目的协作者的角色,他想要完整的历史记录。要获取克隆这个截断后的仓库后的历史数据,需要添加第二个远程仓库指向历史悠久的版本并进行获取。
$ git clone https://github.com/schacon/project
$ cd project

$ git log --oneline master
e146b5f Fifth commit
81a708d Fourth commit
622e88e Get history from blah blah blah

$ git remote add project-history https://github.com/schacon/project-history
$ git fetch project-history
From https://github.com/schacon/project-history
 * [new branch]      master     -> project-history/master
现在协作者将在 master 分支中拥有他们的最近提交,并在 project-history/master 分支中拥有历史悠久的提交。
$ git log --oneline master
e146b5f Fifth commit
81a708d Fourth commit
622e88e Get history from blah blah blah

$ git log --oneline project-history/master
c6e1e95 Fourth commit
9c68fdc Third commit
945704c Second commit
c1822cf First commit
要将它们合并,你只需调用 git replace,指定要替换的提交,然后是用来替换它的提交。所以我们想用 project-history/master 分支中的“第四个”提交替换 master 分支中的“第四个”提交。
$ git replace 81a708d c6e1e95现在,如果你查看 master 分支的历史记录,它看起来是这样的:
$ git log --oneline master
e146b5f Fifth commit
81a708d Fourth commit
9c68fdc Third commit
945704c Second commit
c1822cf First commit
很酷,对吧?无需更改上游的所有 SHA-1,我们就能够用一个完全不同的提交替换我们历史记录中的一个提交,并且所有常规工具(bisect、blame 等)都将按预期工作。
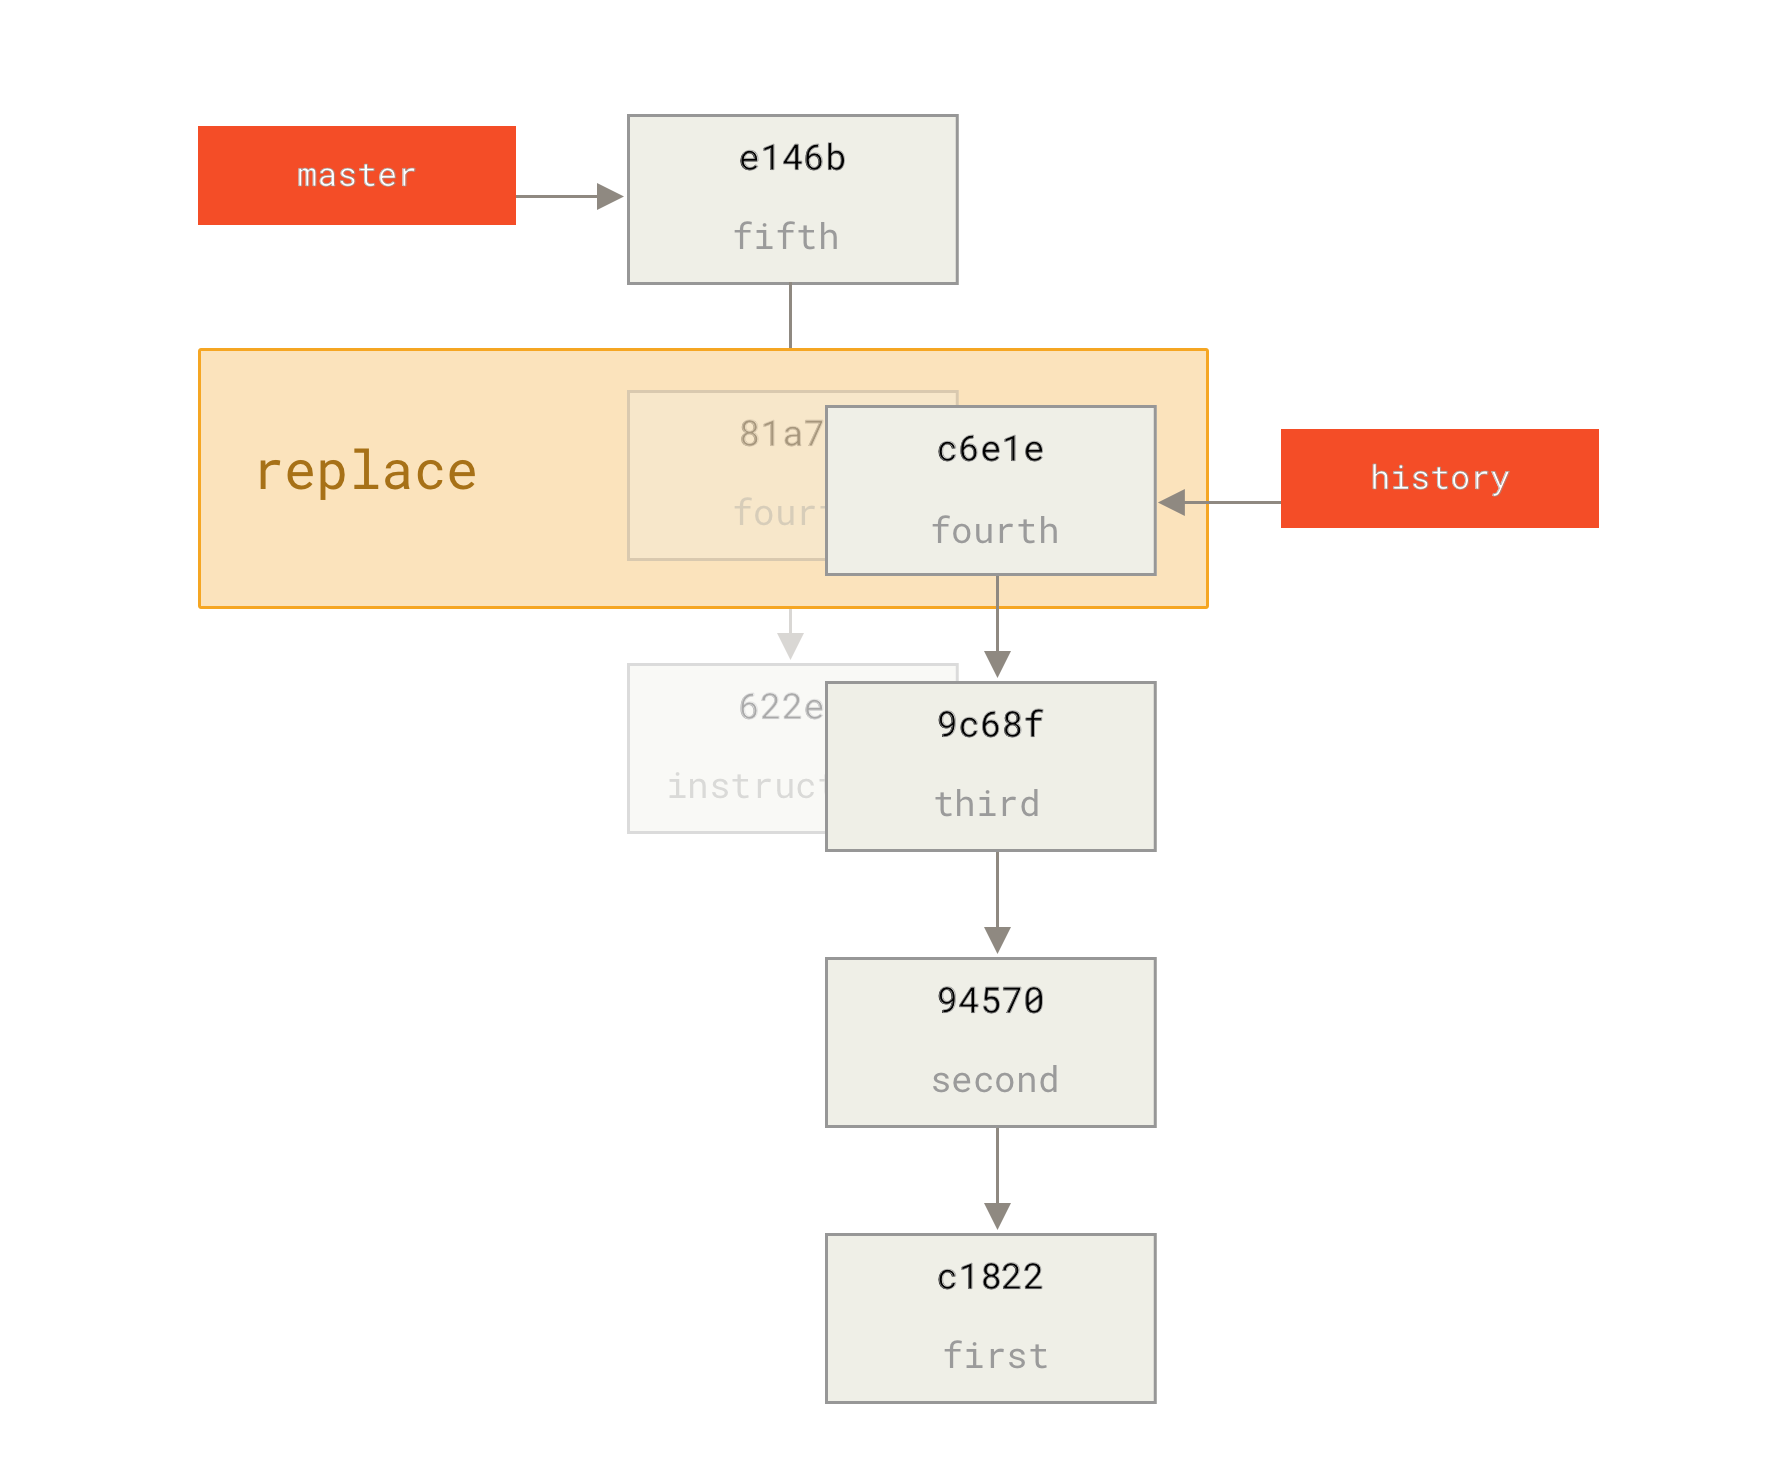
git replace 合并提交有趣的是,它仍然显示 81a708d 作为 SHA-1,尽管它实际上使用的是我们用它替换的 c6e1e95 提交数据。即使你运行 cat-file 这样的命令,它也会显示被替换的数据。
$ git cat-file -p 81a708d
tree 7bc544cf438903b65ca9104a1e30345eee6c083d
parent 9c68fdceee073230f19ebb8b5e7fc71b479c0252
author Scott Chacon <schacon@gmail.com> 1268712581 -0700
committer Scott Chacon <schacon@gmail.com> 1268712581 -0700

fourth commit请记住,81a708d 的实际父提交是我们的占位符提交(622e88e),而不是这里所示的 9c68fdce。
另一件有趣的事情是,这些数据保存在我们的引用中。
$ git for-each-ref
e146b5f14e79d4935160c0e83fb9ebe526b8da0d commit	refs/heads/master
c6e1e95051d41771a649f3145423f8809d1a74d4 commit	refs/remotes/history/master
e146b5f14e79d4935160c0e83fb9ebe526b8da0d commit	refs/remotes/origin/HEAD
e146b5f14e79d4935160c0e83fb9ebe526b8da0d commit	refs/remotes/origin/master
c6e1e95051d41771a649f3145423f8809d1a74d4 commit	refs/replace/81a708dd0e167a3f691541c7a6463343bc457040
这意味着我们可以轻松地与他人共享我们的替换信息,因为我们可以将其推送到我们的服务器,其他人可以轻松下载。这对于我们上面讲到的历史记录嫁接场景来说并不是非常有帮助(因为每个人都会下载两个历史记录,何必分开呢?),但在其他情况下可能有用。